Player Input System
“The player moves with the arrow keys. Ok but how does the game know that?”
Using the Unity Input System Package
Note
For more information on the Input System Package see How to use NEW Input System Package!
Setup:
Select Window > Package Manager
Under the packaged dropdown select Packages: Unity Registry
Click on the Input System Package and click the Install button on the lower right side of the package manager window.
You will get a warning message informing you that the input system package is installed but the backends for the package need to be enabled in the player settings. You can do one of 2 things:
Select Yes if you want to enable the new input system and disable the old input system
or
Select No if you want to use both the old input system and the new input system at the same time. After selecting No go to Edit > Project Settings.. > Player > Other Settings. Under the Active Input Handling select Both
How to Receive Player Input
Note
For this example we will process the player pressing the arrow keys and pushing the space bar.
Right click Create > Input Actions
Select the new input actions asset and in the inspector click on the Edit Asset Button.
We click the plus button under the Action Maps column and create a new action map and call it
PlayerActionMapNote
Action maps are useful for organizing actions. For example you could have one map for player movement and another map for vehicle movement.
With
PlayerActionMapselected, delete all actions under the Actions column. Next click the plus button under the Actions column and create 2 new actionsMoveandJumpWith the
Moveaction selected we go to the Action Properties column, click on the Action Type dropdown and select Value Since we are looking for a continuous range of inputs for movement (like 0 to 1) instead of a button press that has 2 values (like 0 or 1). Next under the Control Type dropdown we select Vector2 since we will be getting input along 2 axes from the arrow keys. For theJumpaction we choose the Button Action type because this action is connected with the space bar.Under the
Moveaction we click the plus button and select Add Up/Down/Left/Right Composite. We then rename the compositeArrowKeys. For each action below the composite we go under the Binding Properties column, click on the Path dropdown and select the corresponding button we want to have assigned to each binding.Under the
Jumpaction we click the plus button and select Add Binding. Next under the Binding Properties column, click on the Path dropdown and select the space bar.Next add an empty game object to your scene and add a Player Input Component to it. Drag your Input Action asset into the Actions parameter and select the Default Map to be the
PlayerActionMap.On the Player Input component, select the dropdown menu called Behavior and choose Invoke Unity Events. Now you will see an Event dropdown appear. Under the Event dropdown expand the PlayerActionMap dropdown and this will give you the ability to trigger effects when receiving input.
Input Binding Remapping
Your game can have the player remap input bindings with the push of a button. This can be accomplished by getting
a reference to an input action and running action.PerformInteractiveRebinding(bindingIndex). Input bindings can
be extracted from actions through a for loop and you can create a custom editor so that the developer can click on
a dropdown to select a specific binding that they want to remap. Below is the script one can use to quickly remap
bindings. All that needs to be done is to call the Rebind() method on a OnButtonClick event.
Note
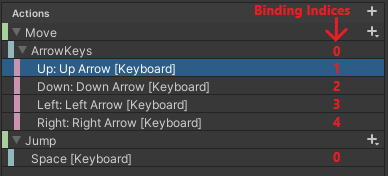
For composite bindings, the binding index starts at 0 at the composite binding and counts up as we move down the bindings below the composite binding. See the image below detailing the binding index for the input actions move and jump:
Additionally you can quickly reset the input bindings back to the default state with the push of a button. This is
accomplished by getting a reference to the input action asset and running map.RemoveAllBindingOverrides() for
each InputActionMap in the asset’s action maps.
RebindInputMenuController.cs
using System.Collections.Generic;
using UnityEngine;
using UnityEngine.InputSystem;
using TMPro;
using UnityEditor;

public class RebindInputMenuController : MonoBehaviour
{
    public TextMeshProUGUI rebindButtonText;
    public InputActionReference inputActionReference;
    public int bindingIndex;

    private InputActionRebindingExtensions.RebindingOperation rebindingOperation;

    void Start()
    {
        RefreshRebindText();
    }

    public void RefreshRebindText()
    {
        rebindButtonText.text = GetInputActionKeyBindingName();
    }

    private string GetInputActionKeyBindingName()
    {
        if (inputActionReference != null)
            return InputControlPath.ToHumanReadableString(inputActionReference.action.bindings[bindingIndex].effectivePath);
        else
            return "No InputActionReference Found";
    }

    public void Rebind()
    {
        if (inputActionReference != null)
        {
            rebindButtonText.text = "Press a Button";
            InputAction action = inputActionReference.action;
            action.Disable();
            rebindingOperation = action.PerformInteractiveRebinding(bindingIndex)
                .OnMatchWaitForAnother(0.1f)
                .WithCancelingThrough("<Keyboard>/escape")
                .OnComplete(operation => RebindComplete())
                .OnCancel(operation => RebindComplete())
                .Start();
        }
    }

    private void RebindComplete()
    {
        rebindingOperation.Dispose();
        rebindButtonText.text = GetInputActionKeyBindingName();

        InputAction action = inputActionReference.action;
        action.Enable();
    }

}

#if UNITY_EDITOR
[CustomEditor(typeof(RebindInputMenuController))]
public class customRebindInputMenuControllerInspector : Editor
{
    public override void OnInspectorGUI()
    {
        DrawDefaultInspector();
        RebindInputMenuController rebindInputMenu = (RebindInputMenuController)target;
        // Because we use this script in a prefab we need to make sure changes made by this custom
        // editor apply to the prefab instance.
        PrefabUtility.RecordPrefabInstancePropertyModifications(rebindInputMenu);
        if (rebindInputMenu.inputActionReference != null)
        {
            InputAction action = rebindInputMenu.inputActionReference.action;
            List<string> bindingNames = new List<string>();
            foreach (InputBinding binding in action.bindings)
            {
                bindingNames.Add(binding.path);
            }

            int index = rebindInputMenu.bindingIndex;
            string[] bindingOptions = bindingNames.ToArray();
            index = EditorGUILayout.Popup("Binding", index, bindingOptions);
            rebindInputMenu.bindingIndex = index;
        }
    }
}
#endif
InputSystemUtilities.cs
using UnityEngine;
using UnityEngine.InputSystem;

[CreateAssetMenu(fileName = "InputSystemUtilities", menuName = "ScriptableObjects/Utilities/InputSystemUtilities")]
public class InputSystemUtilities : ScriptableObject
{
    public void ResetAllBindings(InputActionAsset inputActionAsset)
    {
        foreach (InputActionMap map in inputActionAsset.actionMaps)
        {
            map.RemoveAllBindingOverrides();
        }
    }
}
Example
Important
This example requires the following packages to be installed:
TextMeshPro Essentials
Input System
Warning
This example also includes the following packages:
ScriptableObjectEventSystemV2Example.unitypackage (See Event Architecture: Scriptable Objects V2)
So when you are importing, take care to make sure things are not overwritten / duplicated if you have downloaded those packages in the past.
Click to download the input rebinding example InputSystemRebindExample.unitypackage.
Scriptable Object Input Events
In a different section (Event Architecture: Scriptable Objects) we learned how to create an event system from scriptable objects. Now we shall do the same thing except the scriptable object events will be tied to Input Actions.

InputActionEvent.cs + InputActionEventListener.cs
using System.Collections.Generic;
using UnityEngine;
using UnityEngine.InputSystem;

[CreateAssetMenu(fileName = "NewInputActionEvent", menuName = "ScriptableObjects/Events/InputActionEvent")]
public class InputActionEvent : ScriptableObject
{
    public InputActionReference inputActionReference;
    public bool raiseOnStarted;
    public bool raiseOnPerformed;
    public bool raiseOnCancelled;

    private readonly List<InputActionEventListener> eventListeners = new List<InputActionEventListener>();

    public void Raise(InputAction.CallbackContext context)
    {
        // We go through the listeners in reverse in case some destroy themselves after the event is raised.
        for (int i = eventListeners.Count - 1; i >= 0; i--)
        {
            eventListeners[i].OnEventRaised(context);
        }
    }

    public void RegisterListener(InputActionEventListener listener)
    {
        // Check to see that the eventListeners list does not already contain the target listener
        if (!eventListeners.Contains(listener))
        {
            eventListeners.Add(listener);
        }
    }

    public void UnregisterListener(InputActionEventListener listener)
    {
        // Check to see that the eventListeners list contains the target listener
        if (eventListeners.Contains(listener))
        {
            eventListeners.Remove(listener);
        }
    }

    private void OnEnable()
    {
        if (inputActionReference != null)
        {
            InputAction action = inputActionReference.action;
            // We need to make sure the action is enabled otherwise the input will not be processed.
            action.Enable();

            if (raiseOnStarted)
                action.started += Raise;

            if (raiseOnPerformed)
                action.performed += Raise;

            if (raiseOnCancelled)
                action.canceled += Raise;
        }
    }

    private void OnDisable()
    {
        if (inputActionReference != null)
        {
            InputAction action = inputActionReference.action;
            if (raiseOnStarted)
                action.started -= Raise;

            if (raiseOnPerformed)
                action.performed -= Raise;

            if (raiseOnCancelled)
                action.canceled -= Raise;
        }
    }
}
using UnityEngine;
using UnityEngine.Events;
using UnityEngine.InputSystem;

public class InputActionEventListener : MonoBehaviour
{
    [Tooltip("Event to register with.")]
    public InputActionEvent Event;

    [Tooltip("Response to invoke when event is raised.")]
    public UnityEvent<InputAction.CallbackContext> Response;

    private void OnEnable()
    {
        // Registers instance to the GameEvent so OnEventRaised() is called if the GameEvent is raised
        Event.RegisterListener(this);
    }

    private void OnDisable()
    {
        // Unregisters instance to the GameEvent since OnEventRaised() does not need to be invoked when disabled.
        Event.UnregisterListener(this);
    }

    // We invoke the UnityEvent when we the GameEvent is raised
    public void OnEventRaised(InputAction.CallbackContext context)
    {
        Response.Invoke(context);
    }
}
Example
Click to download ScriptableObjectInputSystemExample.unitypackage.
Important
This example requires the following packages to be installed:
TextMeshPro Essentials
Input System
Note
This example also includes utilities for remapping Input bindings as seen in the section Input Binding Remapping
Scriptable Object Input Events V2
We can refactor the above implementation for scriptable objects events so that:
The game event listener component we add to game objects can listen in on multiple events.
You can find the updated code and example below:
InputActionEvent.cs + InputActionEventListener.cs
using System.Collections.Generic;
using UnityEngine;
using UnityEngine.InputSystem;

[CreateAssetMenu(fileName = "NewInputActionEvent", menuName = "ScriptableObjects/Events/InputActionEvent")]
public class InputActionEvent : ScriptableObject
{
    public InputActionReference inputActionReference;
    public bool raiseOnStarted;
    public bool raiseOnPerformed;
    public bool raiseOnCancelled;

    private readonly List<InputActionEventListener> eventListeners = new List<InputActionEventListener>();

    public void Raise(InputAction.CallbackContext context)
    {
        // We go through the listeners in reverse in case some destroy themselves after the event is raised.
        for (int i = eventListeners.Count - 1; i >= 0; i--)
        {
            eventListeners[i].OnEventRaised(context);
        }
    }

    public void RegisterListener(InputActionEventListener listener)
    {
        // Check to see that the eventListeners list does not already contain the target listener
        if (!eventListeners.Contains(listener))
        {
            eventListeners.Add(listener);
        }
    }

    public void UnregisterListener(InputActionEventListener listener)
    {
        // Check to see that the eventListeners list contains the target listener
        if (eventListeners.Contains(listener))
        {
            eventListeners.Remove(listener);
        }
    }

    private void OnEnable()
    {
        if (inputActionReference != null)
        {
            InputAction action = inputActionReference.action;
            // We need to make sure the action is enabled otherwise the input will not be processed.
            action.Enable();

            if (raiseOnStarted)
                action.started += Raise;

            if (raiseOnPerformed)
                action.performed += Raise;

            if (raiseOnCancelled)
                action.canceled += Raise;
        }
    }

    private void OnDisable()
    {
        if (inputActionReference != null)
        {
            InputAction action = inputActionReference.action;
            if (raiseOnStarted)
                action.started -= Raise;

            if (raiseOnPerformed)
                action.performed -= Raise;

            if (raiseOnCancelled)
                action.canceled -= Raise;
        }
    }
}
using UnityEngine;
using UnityEngine.Events;
using UnityEngine.InputSystem;

// We make this class Serializable so that its properties are displayed in the inspector
// when added to the InputActionEventListenerComponent's listeners list.
[System.Serializable]
public class InputActionEventListener
{
    [Tooltip("Event to register with.")]
    public InputActionEvent Event;

    [Tooltip("Response to invoke when event is raised.")]
    public UnityEvent<InputAction.CallbackContext> Response;

    // We invoke the UnityEvent when we the GameEvent is raised
    public void OnEventRaised(InputAction.CallbackContext context)
    {
        Response.Invoke(context);
    }
}
InputActionEvent.cs + InputActionEventListenerComponent.cs
using System.Collections;
using System.Collections.Generic;
using UnityEngine;

public class InputActionEventListenerComponent : MonoBehaviour
{
    public List<InputActionEventListener> listeners;

    private void OnEnable()
    {
        // Registers each listener to the GameEvent so OnEventRaised() is called if the GameEvent is raised
        foreach (InputActionEventListener listener in listeners)
        {
            listener.Event.RegisterListener(listener);
        }
    }

    private void OnDisable()
    {
        // Unregisters each listener from the GameEvent since OnEventRaised() does not need to be invoked when disabled.
        foreach (InputActionEventListener listener in listeners)
        {
            listener.Event.UnregisterListener(listener);
        }
    }
}
Example
Click to download ScriptableObjectInputSystemV2Example.unitypackage.
Important
This example requires the following packages to be installed:
TextMeshPro Essentials
Input System
Warning
This example also includes the following packages:
InputSystemRebindExample.unitypackage (See Input Binding Remapping)
So when you are importing, take care to make sure things are not overwritten / duplicated if you have downloaded those packages in the past.