Getting Started With iOS
“I want to put a game on an iPhone. What is the first step?”
Quickstart
If you want to run a game in the editor on a iOS device, see Unity Remote.
If you want to build and run it on an iOS device see Unity iOS Build (Requires a MAC).
First Steps
Note
The following information was lifted from https://docs.unity3d.com/Manual/iphone-GettingStarted.html . Visit Unity’s iOS documentation for the most up to date instructions.
Testing Your Game On Devices
Unity Remote
Note
The following information was lifted from https://docs.unity3d.com/Manual/UnityRemote5.html . Visit Unity’s iOS documentation for the most up to date instructions.
Overview
Unity Remote is a application that connects your device (like an iPhone) to the Unity Editor and displays visual output from the editor on the target device’s screen (at a reduced framerate). You can send inputs from the target device back to the running project in Unity. It is useful to see how an application looks and handles on the target device without creating a build.
Set Up
Go to the App Store and download Unity Remote to your iPhone.
Note
As of this writing the application is called Unity Remote 5.
Open a Unity project. (Do this first before connecting your device)
Connect the iPhone with a USB Cable to your computer.
In the Unity Editor, go to Edit > Project Settings. Inside the Project Settings window select from the left sidebar Editor. Next, locate the Device dropdown and select Any iOS Device. You should also be able to see your specific iOS device in the dropdown as well.
Important
If you do not see the Any iOS Device option and you are using a windows device, close out of unity and disconnect your iOS device from your computer. Next download iTunes to your windows device. After installing iTunes, restart your computer, re-open the Unity Editor, and reconnect your iOS device. Then you should see Any iOS Device option. For more information see the video: Unity Remote on iPhone With Windows PC (WORKS)
Note
Sometimes the Any iOS Device option will not present itself right away. In my case I had the unity editor open and uninstalled iTunes before the option presented itself. Make sure iTunes is installed before attempting to run Unity Remote on the iPhone.
In the Unity Editor, click on the play button. You should see the game start playing on your iOS device.
Note
If the game does not play on your iOS device try these steps in the following order:
Open Itunes
Open Unity Editor
Connect iOS Device
Select the Any iOS Device option
click the play button.
After a lot of trial and error I found the above steps to work.
Note
If you are using Unity’s new input system, it is possible that you will not be able to send any inputs from your iOS device to the unity editor. To be able to use the old input system go to Edit > Project Settings > Player > Other Settings and under the Active Input Handling dropdown select Both. Next inside your scene make sure there exists an Event System Game Object that is using the old intput system. If you already have an event system game object with the new input system, delete it and then create a new one. The new event system should be using the Old Standalone Input Module.
Unity iOS Build
Note
Before following these steps make sure you:
Are using a Mac computer
Have updated the XCode application
Add iOS Build Support to your unity installation. You can add iOS Build Support inside Unity Hub by navigating to the Installs tab, clicking the triple dots next to your chosen installation, and selecting Add Modules
In the Unity Editor, navigate to File > Build Settings and switch the platform to iOS.
Inside the Build Settings window click Build and select a folder to build to.
After the build is complete, navigate to your build folder and open the .xcodeproj project file.
To build your game in Xcode, you must connect your Apple ID to Xcode. To do this in Xcode select Xcode > Preferences, select the Accounts tab and add your Apple ID.
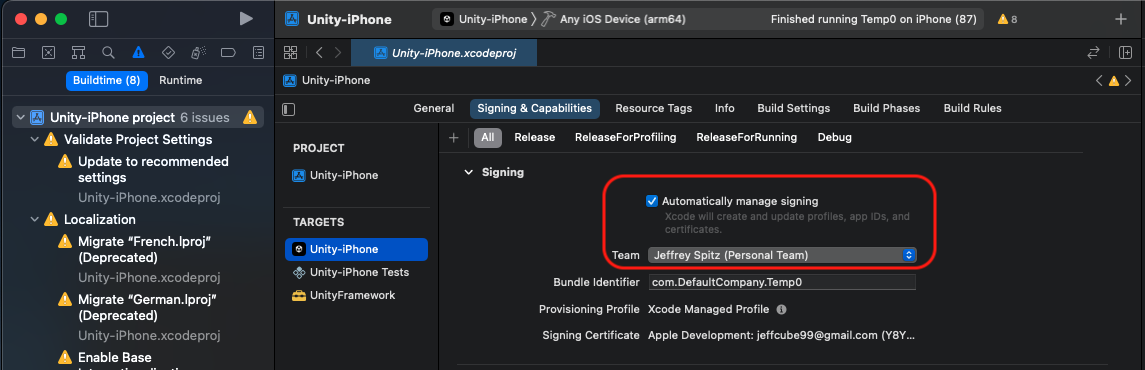
Next under Signing & Capabilities, click the checkbox that says Automatically manage signing, and choose your team associated with your account.
Connect your iPhone to your computer. In the Xcode top bar you should be able to click and select your iPhone that Xcode will build to.


Click on the play button in Xcode. This will build the app to your iPhone.
After the build completes, on your iPhone you should be able to see your application. You can then open and play it.
Important
When attempting to build the game to your iPhone you may get the following error on your computer:
Error
Could not launch: The operation couldn’t be completed. Unable to launch … because it has an invalid code signature, inadequate entitlements or its profile has not been explicitly trusted by the user.
On your iPhone it may give you an error:
Error
Untrusted Developer: your device management settings do not allow using apps from developer … on this ipone. You can allow using these apps in Settings.
To resolve this error, on your iPhone go to Settings > General > VPN & Device Management. Under Developer App select the untrusted apple developer and press the Trust … Option. From this point you should be able to launch the app on your iPhone.